Toyota Prius Gen2 Inverter Controller
The OpenInverter Prius Gen 2 Inverter Controller is an open-source board designed to repurpose the Toyota Prius Gen2 Inverter by replacing the essential components of the Prius wiring harness and electronics. It runs the OpenInverter.org software for vehicle control. It derives from the (now-deprecated) earlier Prius Gen 2 work done by Damien Maguire of EVBMW.com and is Damien's recommended replacement for the Toyota Prius Gen2 EVBMW Throughhole Board.
Purchase
2 versions are available, one mostly-assembled kit with all connectors and an enclosure, and a less expensive incomplete barebones kit:
Full kit: https://openinverter.org/shop/index.php?route=product/product&product_id=63
PCB-only kit: https://openinverter.org/shop/index.php?route=product/product&product_id=68
Project
(Note: Links to Github/etc design files here?)
Hardware Notes
(Note: this section is pretty sloppy, if you're looking to contribute, this would be a nice area to start)
Enclosure Details
| Description | Part Number | Data Sheet |
|---|---|---|
| Cinch Header 12 + 20 | 5810132011 | https://www.mouser.co.uk/datasheet/2/643/Bel_07192016_Modice%20ME-MX-1216545.pdf |
| Modice Enclosure | 5810130075 | https://www.mouser.co.uk/datasheet/2/643/dr-CCS-ICE-5810130065-75-1551287.pdf |
| Molex 12-Pin Connector | 0334721202 | https://www.mouser.co.uk/datasheet/2/276/0334721202_CRIMP_HOUSINGS-162938.pdf |
| Molex 20-Pin Connector | 0334722001 | https://www.mouser.co.uk/datasheet/2/276/0334722001_CRIMP_HOUSINGS-162940.pdf |
| WIFI Module | MOD-WIFI-ESP8266 | https://www.ebay.co.uk/itm/194313893813?epid=2280174677&hash=item2d3e02b7b5:g:v-MAAOSw4ulhJ1wg |
| WIFI Pins | 10-way IDC Box Header Connector | https://www.ebay.co.uk/itm/153727472406 |
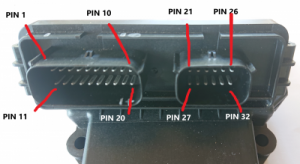
Pin Mapping - Note : Smaller 12-pin socket is the interface to the inverter & 20-pin to the motor

20 - Pin socket
Pin#01 - ENC_B/S3
Pin#02 - S1S4
Pin#03 - ENC_A/S2
Pin#04 - R1
Pin#05 - R2
Pin#06 - 5V
Pin#07 - THROTTLE 1
Pin#08 - THROTTLE 2

Pin#09 - START_IN (12V) Push button type switch - not a permanent 12v input
Pin#10 - BRAKE_IN (12V) Push button type switch - not a permanent 12v input

Pin#11 - FORWARD_IN (12V) (1, 2 or 3 way switch) Do not connect permanently - selected AFTER START
Pin#12 - REVERSE_IN (12V) (1, 2 or 3 way switch) Do not connect permanently - selected AFTER START
Pin#13 - Motor Temp -
Pin#14 - Motor Temp +
Pin#15 - DC (HV) Switch Control (Ground signal)
Pin#16 - Pre-ChARGE Control (Ground signal)
Pin#17 - CAN L
Pin#18 - CAN H
Pin#19 - Ground
Pin#20 - 12V "Ignition"
12 - Pin socket ( starts at pin number #21) - Corresponding pin on Main White 32 pin Inverter connector is in brackets.
Pin#21 - GIVA (2)
Pin#22 - MIVA (7)
Pin#23 - GIWA (18)
Pin#24 - MIWA (23)
Pin#25 - VH (12)
Pin#26 - MIVT (26)
Pin#27 - MFIV (27)
Pin#28 - MUU (9)
Pin#29 - MVU (10)
Pin#30 - MWU (11)
Pin#31 - CPWM (13)
Pin#32 - GINV/GCNV (16/32)
Connect MSDN Pin#25 in inverter (not 25 on controller) permanently to 12V to enable the MG2 Inverter (can be tied to same 12v source as "I9")
Connect CPWM to 12V via a 470 Ohm resistor to enable the Buck/Boost convert if using the DC/DC converter or charge mode.
Connect the 2-pole white power connector ("I9") inside inverter to 12V and Ground to power up inverter electronics.
Make sure to connect Pin #32 and #16 GINV/GCNV to vehicle ground.
Initial Set up
Step 1 : Solder relevant (and included) connector pins to the Adapter Board
Step 2 : Plug in Wifi Adapter and connect ONLY Pin#19 - GROUND and Pin#20 - 12 Volts power supply
Confirm PWR LED lights up along with WIFI LED. Confirm ALIVE LED flashes.
Step 3 : Connect computer/laptop to the wifi network (Example - Inverter 7)
Step 4 : Go to browser toolbar and type in 192.168.4.1 + Enter. (allow pop ups/Trusted site). Confirm Web based Interface appears and list of parameters appear.
If parameters appear, you are now connected to the Adapter board and the Web based Interface - Congratulations - You are now in the Matrix !
Step 5 : Wire up 12 Pin SMD board connector to corresponding 32 Pin Inverter connector, permanent 12 volt supply to Pin #25 (MSDN) of Inverter, and 12V and Ground to 2-pole Inverter connector (next to main 32 pin white connector)
Step 6 : Connect fused 12 volt and Ground to HV Inputs (battery), along with 55 watt light bulb in series (resistor) on the Positive line
Step 7 : Connect fused 12 volt power supply for SMD board , Pin #25, and Inverter 2-pole connector - You are now set up for basic Open Loop motor spinning!
Step 8 : Connect 21 watt light bulbs in Delta connection to the 3 PWM outputs in Inverter (no motor) - https://openinverter.org/forum/download/file.php?id=4273&mode=view
Step 9 : Web Interface Basic parameters ( stm32_sine. bin) set up - to confirm PWM outputs : Full boost (curki= 20000 min) with 12v supply, default forward, ampnom @ 70%, and fslipspnt @1 Hz. Select - "Start Inverter in Manual Mode" Confirm flashing lights.
Step 10 : Connect motor phase wires to inverter PWM outputs. Repeat Step 9 and change "fslipspnt" by 1 unit at a time, until motor spins smoothly. (I noticed Light bulb resistor on HV line lights up when no spinning) along with high current values. Once you have the motor spinning, continue to increase the "fslipspnt" value whilst monitoring the current (ampmeter on PWM output wire) You will also notice the light bulb starting to fade untill there is no more light. Optimal motor spinning in Open Loop Mode ! (these values are related to a 12 volt HV supply - re using these parameters is still to be verified at greater supply voltages)
Software
The Control Board runs Open Inverter software. A set of known-good default inverter parameters can be found here: https://openinverter.org/wiki/Configuration_Files#Toyota_Prius_Gen2_Inverter
Do NOT program a deadtime value over 0 for the Gen2 inverter. It only uses 1 PWM per phase and the inverter itself generates a low-side and high-side signal WITH deadtime.