Tesla Model S/Tesla Gen23 V5 Software

openinverter style charger firmware
Openinverter style firmware advanced features:
- Support for the standard open inverter web interface
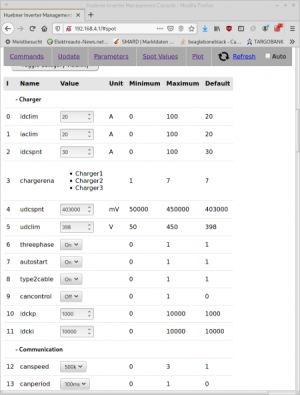
- Parameter handling as known from the inverter firmware (see picture)
- Spot value handling like inverter including plotting, gauges, and logging
- Over the air update like inverter
- DC current control
- CAN control as described above
The firmware requires the board to be flashed with stm32_loader.hex. An Olimex MOD-ESP8266 must be programmed with the openinverter web interface. See Olimex MOD-WIFI-ESP8266 and this forum thread for flashing instructions. With that done, future updates will happen via the web interface.
The firmware will soon be fully published and is only available via patreon for now: https://www.patreon.com/openinverter
Connecting to the Web interface
Depending on the version of your Olimex wifi dongle they are "open" or you need a password to connect.
By default you can connect to the network (Access Point) and browse to: 192.168.4.1
By default all charger kits will have SSID : charger PASSWORD : charger123
Note: Its recommend that you change it. Nobody wants to drive and have some joker with a phone finding this information and accessing your charger.
Parameters
The firmware exports a number of parameters to be modified by the user. All modifications are temporary until you hit "Save Parameters to Flash" at the top of the page.
We will go over all of them.
idclim
This parameter is mainly relevant for CAN operation. It is transmitted via CAN to let the vehicle know how much DC current the charger can deliver. Each charger module maxes out at about 15.5A so the maximum total charging current is 46.5A. Since the total power is also limited to 10 kW it depends on the output voltage as well. There is no need to be exact on this, the firmware will automatically limit the AC input current to each module to the hardware maximum.
iaclim
This is the per-module AC current limit. When charging from a 3-phase outlet (see below) each module will be allowed this current. When charging from single phase, this current will be equally distributed between the enabled chargers.
idcspnt
DC charge current limit. An additional limit to charge power. It is also mapped to the CAN bus so if you have a BMS that calculates a maximum charge current you can forward this to the charger.
chargerena
Here you can program which charger modules you want to enable. It is a flag channel, so 1 means "Module 1 enabled", 2 means "Module 2 enabled" and 4 means "Module 3 enabled". Combining these flags enables multiple modules, e.g. 5=4+1 enables modules 1 and 3. 7=4+2+1 enables all modules. This is the default. The parameter can not be directly changed, but you have to type "set chargerena 5" next to where it says "Send Custom Command" on the top of the page and then press the button.
udcspnt
This modifies the constant voltage setpoint of the chargers. This value is transmitted directly to the modules without further processing. It lets you add a constant voltage phase to your charge process. When reaching this voltage the chargers will control the current to maintain this voltage.
udclim
This parameters specifies a charge end condition. When the voltage is hit the charging process stops and will not resume until you re-plug the charge cable. If you wish to add a constant voltage phase and control charge end by your BMS, set this parameter higher than udcspnt.
timelim
Another charge end condition. Charge only for the specified time in minutes.
timedly
The default value is -1 but this results in the charging waiting forever. You need to set this to 0 (or more) for the OBC to work.
inputype
Type2: Specifies one or more modules are operated on ONE common phase of a Type-2 EVSE. The limits imposed by cablelim and evselim (pilot signal) are distributed equally over the enabled modules. For example if you enable all 3 modules, the cable allows 32A but the EVSE only allows 16A, every module will run at 16/3=5.3A. Charging will start automatically as soon as proximity and a valid pilot signal is detected. Note: You must still have the D1 enable line high. All charge modes require D1 to be high.
Type2-3P: Specifies each module is connected to a different phase of a Type-2 EVSE. The limits imposed by cablelim and evselim are allowed for each module. Type-2Auto: relies on input D2 to indicate that 3 phase is present (from external relay), to allow charging on either single or three phase automatically.
Type1: Like Type2 but cablelim is always assumed 40A.
Manual: Specifies one or more modules are operated on ONE common phase, power is distributed like in Type2 mode. Charging starts as soon as the enable pin "D1" goes high. iaclim MUST be configured to the limits of your AC source as there is no automatic detection like in Type1 or Type2 modes.
Manual-3P: Specifies that each module is connected to a different phase of 3-phase outlet. Each module is allowed iaclim AC current. iaclim MUST be configured to the limits of your AC source as there is no automatic detection like in Type1 or Type2 modes. cancontrol
When on, expect charging instructions via CAN message 0x102 as described above. Charging will start when the enable bit is set. when no CAN message is received for 1s, charging will stop. Note that the digital enable input "D1" also needs to high to allow charging. Also the autostart conditions apply when enabled.
idckp/idcki
Can be used to tune the control loop of the DC current PI controller.
pin
Software pin, obtained by registration (No longer required)