- double click the .ino file to open it in the Ardunio IDE
- double click the .ino file to open it in the Ardunio IDE
3.7. Connect board to USB and select correct COM port and rest of settings
3.7. Open Johannes Web interface code in the Ardunio IDE by double clicking the .ino file. The following edit may be needed:
- at about line 14 of the code (not the comments) there’s a line that should read "bool fastuartavailable = false;" if the value is set to true change it to false
3.8. Connect board to USB and select correct COM port and rest of settings
- if you used a new board you have to select "erase flash: sketch + wifi settings" so the board will erase its password
- if you used a new board you have to select "erase flash: sketch + wifi settings" so the board will erase its password
Revision as of 17:13, 24 November 2022
The Olimex MOD-WIFI-ESP8266 WiFi expansion module is commonly used to provide WiFi connectivity and interface for several inverter controllers including the OpenInverter system. This module connects to the controllers via the UEXT header connector.
3.3. Install the CH340 driver on your computer. When the installer opens run the uninstall option first to remove any previous versions of the driver. Then perform the installation.
- make a note of the name of the .ino file then rename the enclosing folder with the same name (ie if the .ino file is ‘eps8266-web-interface.ino’ rename the enclosing folder ‘eps8266-web-interface’)
- move the renamed folder to the Arduino folder on your hard disc. This is usually inside your documents folder (eg …\Documents \ Arduino \ eps8266-web-interface )
- double click the .ino file to open it in the Ardunio IDE
3.7. Open Johannes Web interface code in the Ardunio IDE by double clicking the .ino file. The following edit may be needed:
- at about line 14 of the code (not the comments) there’s a line that should read "bool fastuartavailable = false;" if the value is set to true change it to false
3.8. Connect board to USB and select correct COM port and rest of settings
- if you used a new board you have to select "erase flash: sketch + wifi settings" so the board will erase its password
- click upload and wait for interface to reset the board
- select tools/ESP8266 sketch data upload and wait for the board to reset
- connect to the board’s WiFi network then go to http://192.168.4.1/ to see the web interface
- remember set up your own wifi name and password for the interface
WiFi doesn't show up
- in Arduino studio Tools -> Serial Monitor gives debug info of the chip. If the Serial Monitor says "Unknown command sequence" you need to change the TTL
- if GPIO0 is not resoldered, the chip is in programming mode and will not boot from the flash code
FileNotFound Error in WebInterface
Upload the files from the repository https://github.com/jsphuebner/esp8266-web-interface with below command:
If the above commands don't work, try removing the single apostrophes around the filename, there seems to be some discrepancies in Curl formatting between Linux and the version included in Windows 10 command prompt.
Example: curl -F data=@wifi.html http://$IP/edit
Replace $IP with 192.168.4.1
Flashing Process for GS450H
Part 1 : Software and IDE.
https://www.arduino.cc/en/software
I've tested this on 1.8.13 so go ahead and grab that and install.
Next you will need to add the ESP8266 to your boards manager.
If experiencing connection issues, try different cables to rule out bad connectors ( apparently common with recent Olimex)The settings & partition size in Arduino Studio are easy to get wrong. [1]
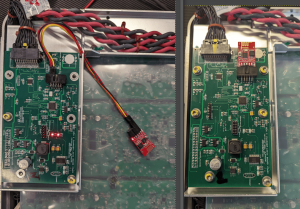
If you get any of: 1) incomplete responses via HTTP 2) patchy WiFi on a logic board 3) parameters from logic board not loading in web interface; you can try powering the ESP8266 from a different source, or connect it via DuPont leads to rule out connector & plug issues (see photographs).
If you are all out of luck, there are alternative boards discussed here [2]