[WIP] Dual motor W124 E320 Estate

Tell us about the project you do with the open inverter
Post Reply
RobCote
Posts: 131
Joined: Sun Sep 24, 2023 10:54 am
Has thanked: 27 times
Been thanked: 13 times

[WIP] Dual motor W124 E320 Estate

Post by RobCote »

Hi all

I'm not sure [WIP] is the proper tag at this point, but it's the closest available. I still feel like I'm in the planning stages, but I could use a bit of help already. That's probably a sign but I'm going to willfully ignore it and push on. What I really want to build is a Tesla dual motor conversion. I've been trying to plan out a build specifically for drag and drive events for a while now, and just saw that P.S.Mangelsdorf beat me to it. Big congrats to them for finishing Drag Week this year.

I intend to pick up a ~complete-ish Model S dual motor and harvest its running gear. I wanted to run this plan by you guys, though, because I've got a few questions. What I'm thinking of doing is of course installing both motors - likely SDU in the front and LDU in the rear just because that's the original configuration, but we'll see once the hardware is all together, what fits where. I would like to try to use the Model S battery as well since I'll have it and it should be the simplest to integrate (electrically speaking), but this will largely depend on the shape and size of things. I've also considered splitting it up into a front pack and a rear pack if I can't fit it in the main floor. I'm looking at a model year 2016+ Model S because the chargers had a higher capacity. Thanks to this forum for that info. I'm in Florida, so air conditioning is also a must. That's all I really want to carry over from the Model S to the E320. Anything else is low-priority "maybe someday" projects that will never happen.

My biggest question is would this truly require an - or rather two - OpenInverter boards? I think it depends on the extent of the swap, right? If I were to put all of the Tesla control systems in, it should work because it won't "know" it's riding in an old chassis. But do we know the lower limit of what hardware is needed to run on the OE control boards? I assume the entire CAN-BUS system would need to be online, but I'm not certain. Assuming I do need OI boards, I'd also need a vehicle control unit to make them play together, correct? Something like Zombieverter, but are there any other options?

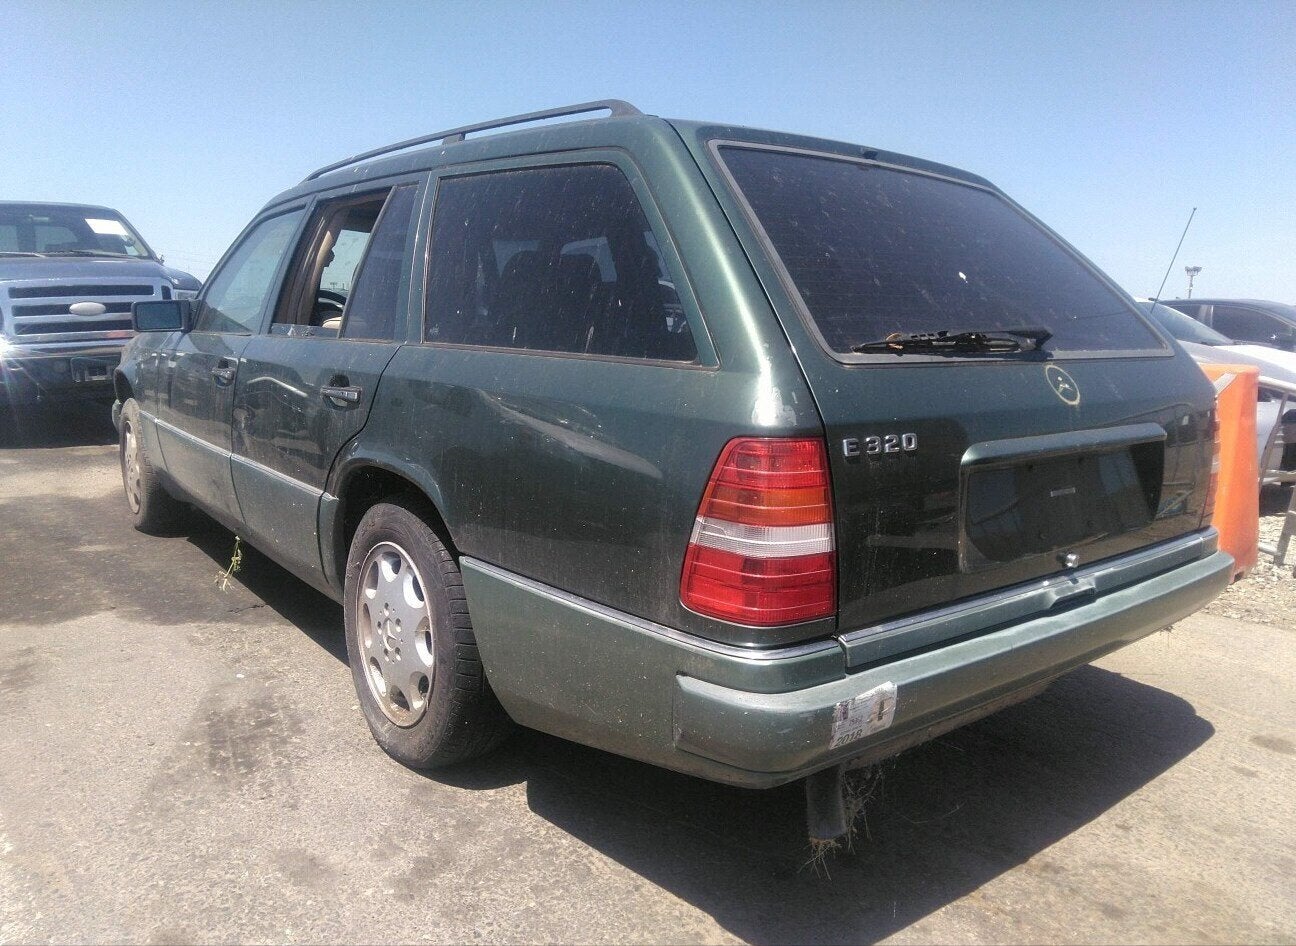
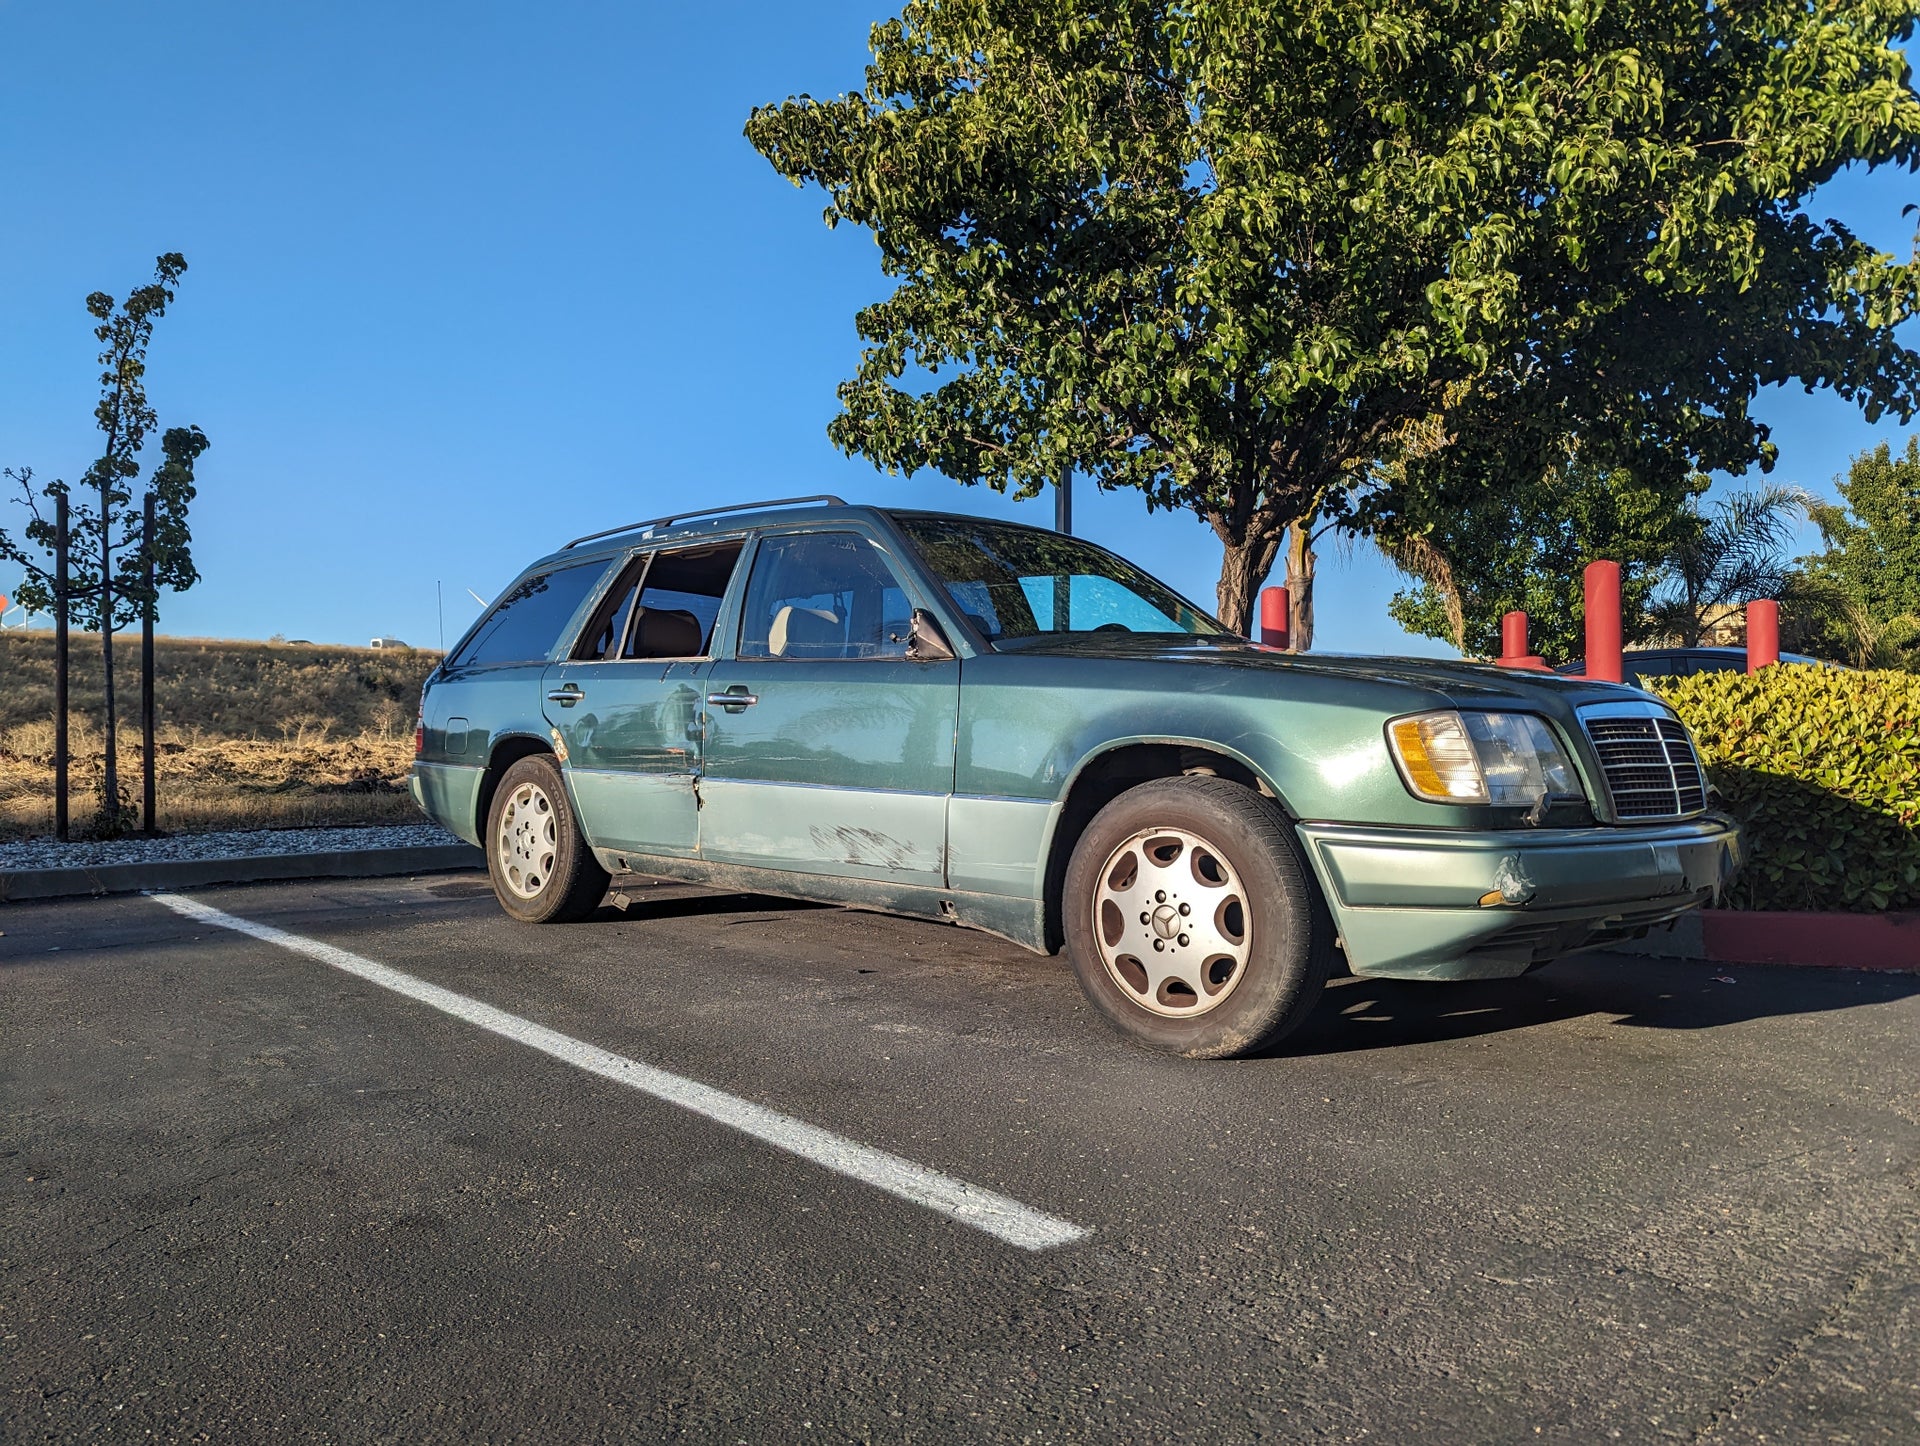
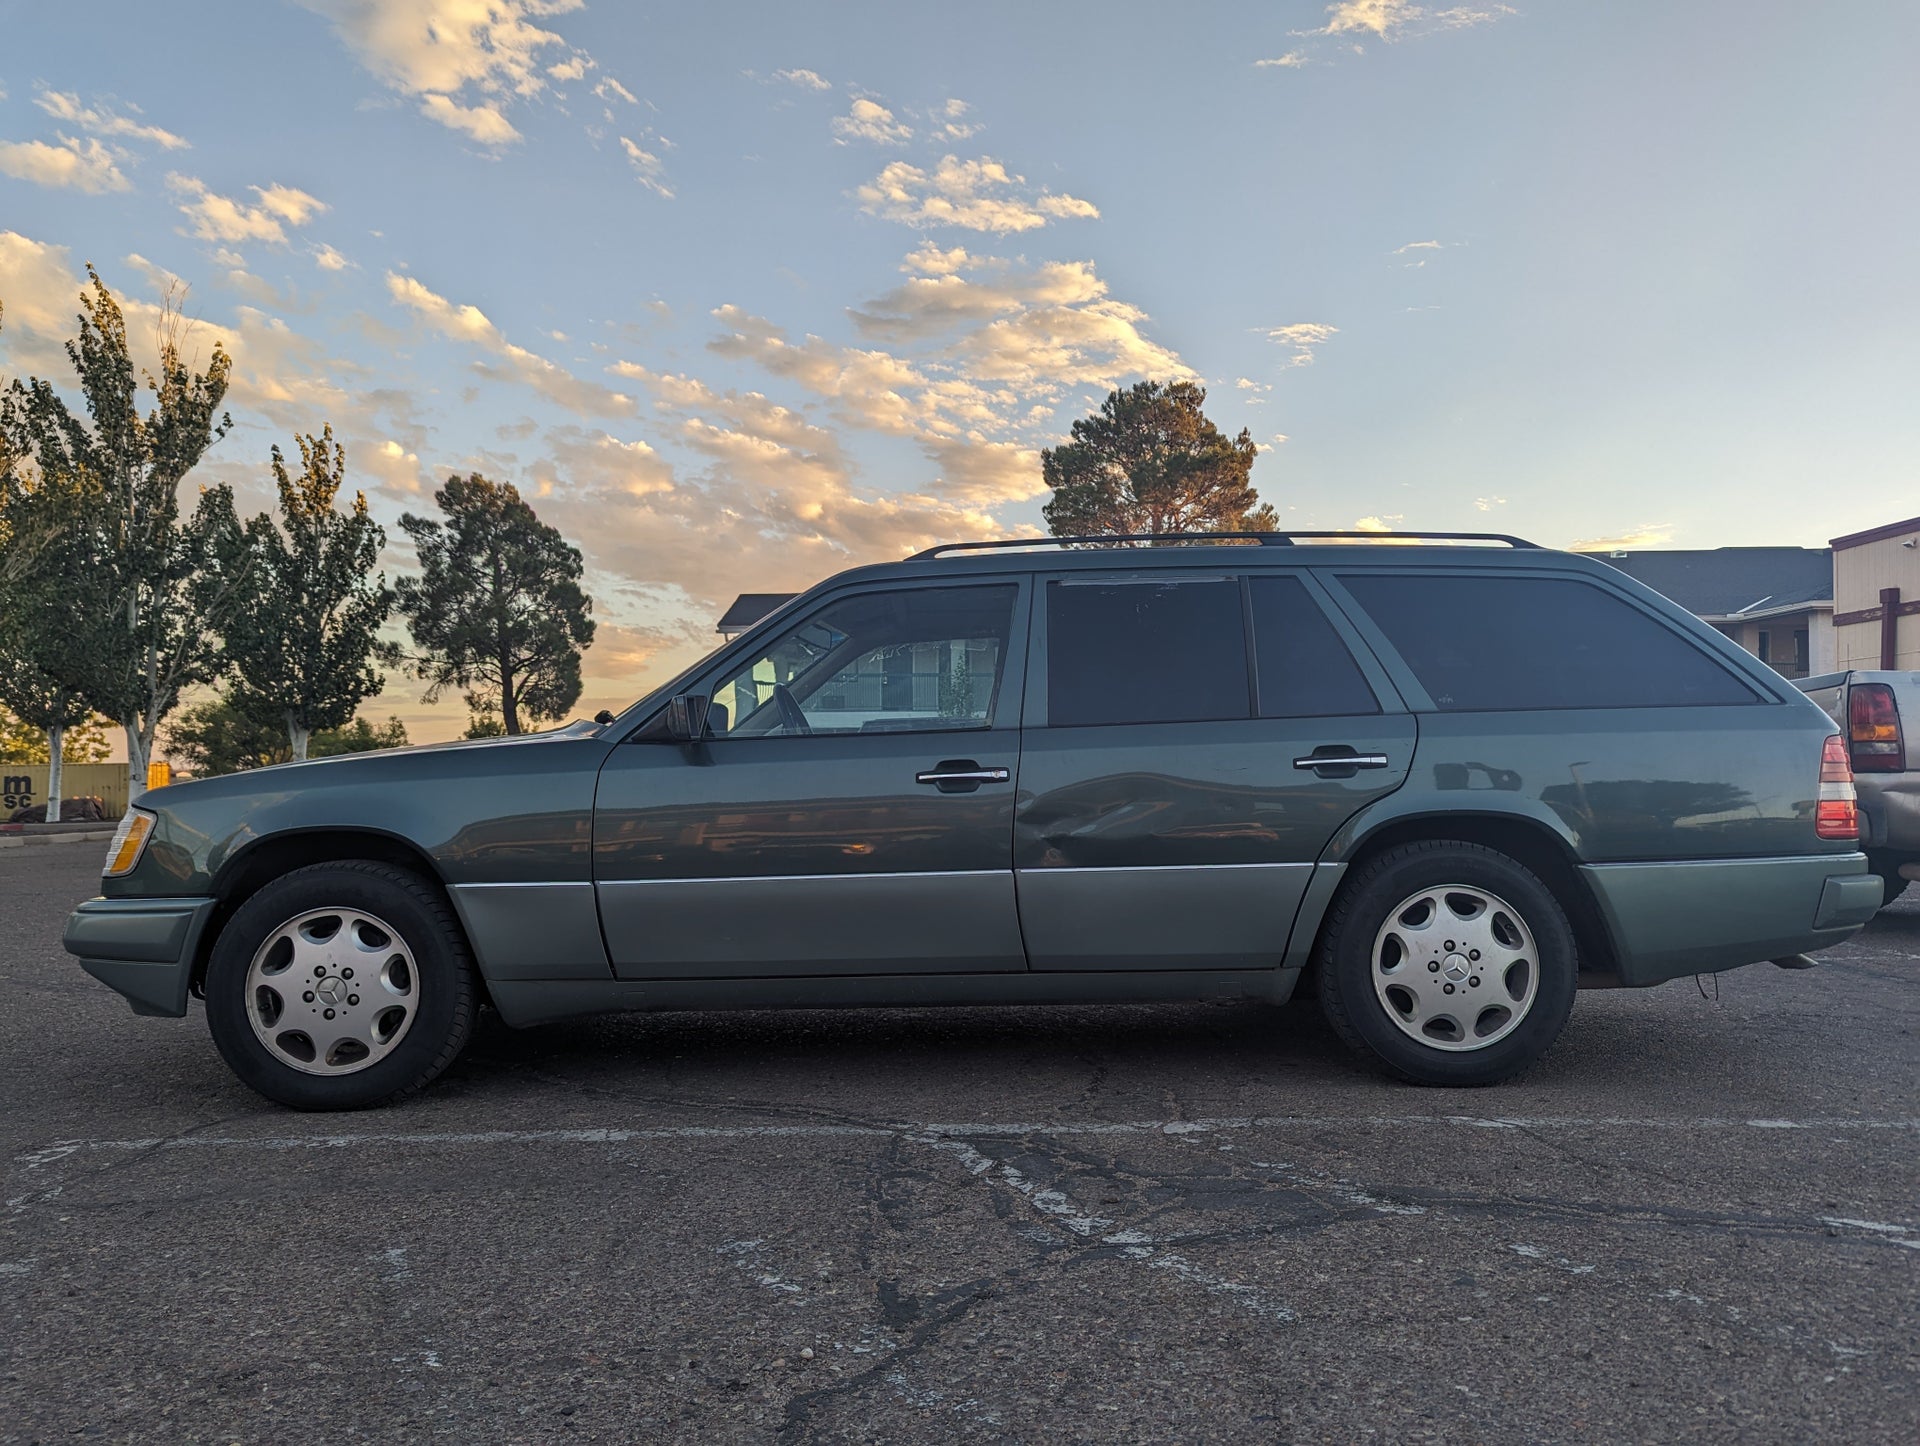
Anyways, that's just a preliminary list of questions to help ensure I plan and shop correctly. I haven't had much luck finding any info on completed dual-motor swaps. There's one shop down here in FL that's done it in a C10, but that's running on Holley controls, I believe. And I think there's one or two others that were also professional builds. What I'd really like to do is document this so it's a bit more accessible to people who know as little as I do. The intent is equal parts going fast and learning EVs because I ain' never done this before. If you made it that far, here are a couple pictures of the chassis for this conversion. It's pretty clapped, but the structure is solid and it was dirt cheap. A truly rust free CA car. It's already rustled a lot of jimmies on the Mercedes forum where I've written my intent. Apparently, according to them, if it doesn't have that MB stamp on it, it cannot possibly work.

Image

Image

Image
User avatar
johu
Site Admin
Posts: 6708
Joined: Thu Nov 08, 2018 10:52 pm
Location: Kassel/Germany
Has thanked: 367 times
Been thanked: 1536 times
Contact:

Re: [WIP] Dual motor W124 E320 Estate

Post by johu »

Lovely, used to have one of these, just never made friends with the ridiculous fuel consumption.

Porting an entire modern car system into another vehicle is considered a pain in the A-pillar. Rolling with the OI boards can be as simple as connecting the same throttle signal to both for permanent 4WD. Maybe RWD/FWD selection by means of the switch that removed the forward/reverse signal from one drive unit.
For anything more elaborate a VCU is more practical I'd think
Support R/D and forum on Patreon: https://patreon.com/openinverter - Subscribe on odysee: https://odysee.com/@openinverter:9
User avatar
janosch
Posts: 329
Joined: Tue Jun 30, 2020 9:23 am
Location: London, UK
Has thanked: 98 times
Been thanked: 102 times
Contact:

Re: [WIP] Dual motor W124 E320 Estate

Post by janosch »

RobCote wrote: Mon Oct 02, 2023 1:08 pm ...
My biggest question is would this truly require an - or rather two - OpenInverter boards? I think it depends on the extent of the swap, right? If I were to put all of the Tesla control systems in, it should work because it won't "know" it's riding in an old chassis. But do we know the lower limit of what hardware is needed to run on the OE control boards? I assume the entire CAN-BUS system would need to be online, but I'm not certain. Assuming I do need OI boards, I'd also need a vehicle control unit to make them play together, correct? Something like Zombieverter, but are there any other options?
...
OpenInverter isn't the only solution, but porting the whole system is not a good idea, I have done it on a prototype and regretted it. I know other people who have done it and regretted it. This was for the Leaf/eNV200 system, so Tesla might be different.

Things that will cause needless pain:
  • power steering
  • speedo
  • windshield wipers
  • ABS
The brain of a Nissan checks if all these systems are present, and is unhappy if it doesn't find one, so either you have to figure out all their discrete signals as well as CAN messages and fake it in great detail - or bite the bullet and have the system hidden away under the bonnet somewhere even if it is not connected to anything else. If it is not connected to anything else it might report errors, then still immobilising your car.

Strongly advise against this approach. I also imagined car systems would be like an onion where you take layers off until you are happy. It is more like an egg, you got to smash it up and rebuild from first principles and you will have a much better time.

P.S: I used to have a W123, great project you have there!
RobCote
Posts: 131
Joined: Sun Sep 24, 2023 10:54 am
Has thanked: 27 times
Been thanked: 13 times

Re: [WIP] Dual motor W124 E320 Estate

Post by RobCote »

That's about what I expected would be the case. As neat as it would be to completely modernize this old clunker, it's not what I'm interested in doing right now. Porting over every feature can be a project for someone else. I just wanna go fast.

In that case, am I correct in understanding that OI would be a good solution? I.e. - 2 boards (one for each drive unit) plus a VCU.
RobCote
Posts: 131
Joined: Sun Sep 24, 2023 10:54 am
Has thanked: 27 times
Been thanked: 13 times

Re: [WIP] Dual motor W124 E320 Estate

Post by RobCote »

johu wrote: Mon Oct 02, 2023 8:59 pm Lovely, used to have one of these, just never made friends with the ridiculous fuel consumption.

Porting an entire modern car system into another vehicle is considered a pain in the A-pillar. Rolling with the OI boards can be as simple as connecting the same throttle signal to both for permanent 4WD. Maybe RWD/FWD selection by means of the switch that removed the forward/reverse signal from one drive unit.
For anything more elaborate a VCU is more practical I'd think
Not sure how I missed this initially. Thanks for the info, that's super helpful. I'd like to keep it simple, because I know it'll be a challenge irregardlessly. RWD (or FWD) with selectable AWD by means of a switch isn't above my pay grade. That's a great solution.

Again, I love the idea of someone else doing a full swap including all the subsystems. Maybe someday I'll attempt it, but first let's get up and running.
RobCote
Posts: 131
Joined: Sun Sep 24, 2023 10:54 am
Has thanked: 27 times
Been thanked: 13 times

Re: [WIP] Dual motor W124 E320 Estate

Post by RobCote »

I've finally got a Tesla donor from which to harvest parts. It's a 2018 Model S 75D. So I believe this is a better charger (but maybe not their absolute highest capacity?) than earlier years. Is that correct?

Image

I'd like youz guyzes input on everything I should retain from the car. My main objectives are to be able to drive it with both motors, so obviously the drive units are required, as well as the HV battery pack. I also want to keep the charger to be able to charge it. I'll hang onto all the HV cabling as well. I'll keep the battery cooling system components. But what else am I missing? Will I need control unit(s), or can OI handle battery cooling and charging all on its own? Any recommendations on what to keep is greatly appreciated!
User avatar
crasbe
Posts: 294
Joined: Mon Jul 08, 2019 5:18 pm
Location: Germany
Has thanked: 47 times
Been thanked: 146 times

Re: [WIP] Dual motor W124 E320 Estate

Post by crasbe »

You should consider removing all or most the wiring loom. Not only for the connectors, but you're gonna need cables for the wiring of everything. And with the original wiring loom, you already have automotive grade cables, for free! In many different colors.
RobCote
Posts: 131
Joined: Sun Sep 24, 2023 10:54 am
Has thanked: 27 times
Been thanked: 13 times

Re: [WIP] Dual motor W124 E320 Estate

Post by RobCote »

It's been a minute. We bought a house, so everything that entails is my excuse.

Image

I've at least got everything all in one place, now. I removed the engine and transmission from the car and sold those off. I got the fuel tank out, exhaust out, and the rear diff out. Most of all that is sold or pending as well. I removed the rear subframe with all the suspension bolted to it as one unit. I'm keeping that. Essentially, I'll swap out the differential for the rear drive unit. Sounds easy. I've been chipping away at removing various ICE odds and ends that are in the way and unnecessary.

Image

In parallel, I've been working on the onboard charger. It's a 2018 donor car, so I ordered a gen 3 V3 openinverter control board. I think I've got it all wired up correctly, but I can't seem to get it to work. No matter what I do, the module boards flash only once when power is applied to the control board. I still have a couple other things to try, but I'm running out of information to go on. I'm leaning pretty heavily on documentation for the gen 2 charger control board, and hoping that it's relevant. I have intentions to add as much as I can to the documentation, but first I need to ensure I know what the heck I'm doing.

Image

I've opened up the rear "control" section of the Model S battery pack to get access to the contactors. I had to do this in order to close them and connect the battery to the charger, because I don't have anything else laying around the house that can just accept 200+VDC. It's been a learning experience, and I'm here for it, but dang it if it's not frustrating at times!

Image
RobCote
Posts: 131
Joined: Sun Sep 24, 2023 10:54 am
Has thanked: 27 times
Been thanked: 13 times

Re: [WIP] Dual motor W124 E320 Estate

Post by RobCote »

I've left you guys hanging for a long while. Sorry about that. I've been making baby steps, but a lot of it hasn't felt post-worthy. I finally have reached what feels like a milestone so let's catch you up. I've been a bit scattered with respect to the order of operations. A lot of things have kind of been happening in parallel as I have time to chip away at them. So in non-chronological order, I'll just write this in more of a logical order of things sort of order.

As you know - or knew and forgot about because it's been so long - I have essentially a whole Model S 75D. All the good bits, anyway. These battery packs are huge and unruly. I've been dealing with it all along and I finally got sick of it muscling it back and forth under the car to get it out of my way as needed. I wheeled it out of the garage for the last time and ripped the top sheet off and pulled out all the modules. I stacked them neatly in the corner and got rid of the case. This left SO MUCH room for activities.

Image

Image

I picked up a TIG machine off Marketplace. I tinkered with it a little on 110V but it kept tripping the breaker. I finally got around to installing a dedicated 220V outlet so I can actually utilize the welder for more than 30 seconds at a time. I'm not great (yet), but I can stick stuff together at least. Another thing you may have forgot (hell, I forget if I even told you guys about it) is that I had to cut the top rail of the radiator support out of the car when we removed the engine and transmission. Apparently, it was designed to be removed separately (transmission out the bottom, engine out the top). It was too late by the time we realized that, so I just cut the support. Well, with the welder up and running, I was finally able to reassemble the hood latch piece to the rest of the car. Without making any adjustments at all, the hood gaps are perfect, and the latch works perfectly, just as before. It still needs cleanup, paint, and reassembly of the headlights and whatnot, but that's all easy stuff.

Image

Image

The rear subframe in this car is a welded assembly that bolts to the floor of the car in reinforced areas. The subframe is essentially comprised of driver's side and passenger's side tube sections over each axle which are connected by a front and rear crossmember. All the suspension arms (I think 5 per side?) bolt to the rear subframe tube sections, and the original rear differential mounted to the rear crossmember as well. Saving you a lot of time - A LOT of time - I determined that the best way to make the motor fit is to run it in reverse and put the motor and inverter in front of the differential. I realize I'll have to modify the oil pump pickup and regulator. I'll deal with that eventually, not a huge deal. To make the story a bit longer and add a little detail, we tried putting the motor in frontwards initially.

Image

Fitting the motor to the rear subframe in the forwards orientation required removing the rear crossmember. So I pulled out the motor, pulled out the complete rear subframe, cut out the rear crossmember, reinstalled the rear subframe to the body, lifted the motor back into position and realized it wasn't going to work. There were too many interferences to overcome and it would have resulted in poor driveshaft angles. We ultimately decided to flip the motor around and try it all over again. This meant pulling the motor back out, removing the rear subframe, cutting out the FRONT crossmember (this made the subframe into two totally separate pieces), putting the rear suspension back into the car, then lifting the motor into place again. Once we saw how everything would fit together in the car, we were confident in a path forward. So we removed the rear subframe and suspension again to weld the rear crossmember back in, then put everything back into the car again.

You guys know how this goes, right? Like, you've all got your own builds going and you already know how you have to do everything a thousand times before you do it for the last time. But I did still want to write it out to underscore why this takes as long as it takes. So much time spent just laying under the car eyeballing things and taking measurements. Figuring out the best way to make it all fit. But we finally came up with a plan and it's so much easier than we made it by doing all the work outlined above. Hindsight is crystal clear. We couldn't have known without figuring it out the hard way.

Image

So, it was finally time to get the motor into its final position. We had the suspension in place, the motor on a shady transmission jack, and a full afternoon free. We cut a window in the rear crossmember to make a pocket for the front motor mount (which will henceforth become the REAR motor mount since it's getting installed backwards). This allowed the motor to slide towards the rear of the car at least a few inches, making the required floor cut much smaller. We took a zillion measurements and overall-eyeballed the motor relative to the car for a while, then marked our cuts. We gutted the interior and then went to town with the cutoff wheel. Somehow, we're even able to keep the rear seat!!

Image

Image

I'm so stoked. This felt like a major milestone. I'm obviously glossing over a TON of detail here, but you guys can probably assume a lot of it. I'm almost in a spot now where I'm ready to start really rolling on progress. I need to learn more about precharging and contactor control - if you guys have resources to help an idiot like me understand what I need to do to make those things work, that would be awesome. Anyway, there's a bunch of stuff. I'm hoping to have more regular progress updates now that I have a rough idea of what the heck I'm doing.
User avatar
tom91
Posts: 2391
Joined: Fri Mar 01, 2019 9:15 pm
Location: Bristol
Has thanked: 206 times
Been thanked: 563 times

Re: [WIP] Dual motor W124 E320 Estate

Post by tom91 »

Holy shit batman DO NOT store batteries like that.
Creator of SimpBMS
Founder Volt Influx https://www.voltinflux.com/
Webstore: https://citini.com/
RobCote
Posts: 131
Joined: Sun Sep 24, 2023 10:54 am
Has thanked: 27 times
Been thanked: 13 times

Re: [WIP] Dual motor W124 E320 Estate

Post by RobCote »

They seem fine??
User avatar
tom91
Posts: 2391
Joined: Fri Mar 01, 2019 9:15 pm
Location: Bristol
Has thanked: 206 times
Been thanked: 563 times

Re: [WIP] Dual motor W124 E320 Estate

Post by tom91 »

Your batteries your choice.
Creator of SimpBMS
Founder Volt Influx https://www.voltinflux.com/
Webstore: https://citini.com/
RobCote
Posts: 131
Joined: Sun Sep 24, 2023 10:54 am
Has thanked: 27 times
Been thanked: 13 times

Re: [WIP] Dual motor W124 E320 Estate

Post by RobCote »

I mean it seems like you believe I’m doing something wrong but refuse to explain how I could do it better which is pretty irritating if I’m honest.
User avatar
tom91
Posts: 2391
Joined: Fri Mar 01, 2019 9:15 pm
Location: Bristol
Has thanked: 206 times
Been thanked: 563 times

Re: [WIP] Dual motor W124 E320 Estate

Post by tom91 »

viewtopic.php?t=5762

Posted my answer here. This topic got started I did not realise how little respect you are showing to the battery modules, please be more careful how you handle and store them or you may find more failures/damage occurring.
Creator of SimpBMS
Founder Volt Influx https://www.voltinflux.com/
Webstore: https://citini.com/
Ruudi S
Posts: 75
Joined: Sun Apr 12, 2020 2:02 pm
Location: EU Estonia
Has thanked: 27 times
Been thanked: 28 times
Contact:

Re: [WIP] Dual motor W124 E320 Estate

Post by Ruudi S »

RobCote wrote: Mon Nov 18, 2024 4:54 pm So, it was finally time to get the motor into its final position. We had the suspension in place, the motor on a shady transmission jack, and a full afternoon free. We cut a window in the rear crossmember to make a pocket for the front motor mount (which will henceforth become the REAR motor mount since it's getting installed backwards). This allowed the motor to slide towards the rear of the car at least a few inches, making the required floor cut much smaller. We took a zillion measurements and overall-eyeballed the motor relative to the car for a while, then marked our cuts. We gutted the interior and then went to town with the cutoff wheel. Somehow, we're even able to keep the rear seat!!
Thank you very much for sharing your progress!

Why did you put the motor in front of the rear axle? Didn't it fit between the two wishbones?

Motor under the rear seat needs much more space, it will move on it's bushings quite a lot because of the 200Kw it makes.
RobCote
Posts: 131
Joined: Sun Sep 24, 2023 10:54 am
Has thanked: 27 times
Been thanked: 13 times

Re: [WIP] Dual motor W124 E320 Estate

Post by RobCote »

That’s correct. With the motor aft, it hit the lower control arm inner mounts AND put the axles at a wonky angle.

I think the motor has sufficient clearance, but we’ll see. If not, I’ll just use harder bushings.
RobCote
Posts: 131
Joined: Sun Sep 24, 2023 10:54 am
Has thanked: 27 times
Been thanked: 13 times

Re: [WIP] Dual motor W124 E320 Estate

Post by RobCote »

Suppose I owe you guys a bit of an update. It was a busy holiday season and I got a lot more done than I expected. No real significant changes since the last update, but I did tie up a lot of the loose ends, and made a lot of progress towards being "done" with this rear motor installation. First and foremost, I had to fill in the gaping hole in the floor. I was fighting some issues with the welder, as well as as the general learning curve of TIG welding thing sheet. So, it's not pretty, but it's in there.

Image

Then I set to work on the front motor mount. This is a simple 2x2" square tube welded to the floor in a convenient recess Mercedes provided for this purpose. I made up a couple mounting tabs to pick up the bushing and that was done.

Image

Then I moved to the rear motor mount. This was just a couple 2"x3/16" brackets bent and shaped to fit the rear subframe where the original differential mount was.

Image

The third motor mount I thought would be a lot more challenging than it turned out to be. Once the other two were tacked into place, I found that the Tesla bushing bracket fit nicely beneath the subframe. I whipped up a couple mounting tabs for it and clearanced for the control arm bolt and that was sorted.

Image

I welded the rear seatbelt nut plates onto the floor patch so the seat belts will be functional. Then I seam-sealed the underside of the patch so it won't leak hopefully. Still on my to-do list is to get some paint on the patch panel to prevent rust.

Image

Seam sealed and primed the top side, so I could put the interior back together.

Image

I cleaned and conditioned all the interior pieces and trim before reassembly, so it looks halfway decent as it goes back together. It's far from perfect but it's a thousand times better than it was.

Image

Image

I pulled the motor and subframe back out to finish-weld everything up outside of the car.

Image

Image

And finally, I got around to putting this piece of subfloor back in that I erroneously chopped out a few months ago.

Image

Image
RobCote
Posts: 131
Joined: Sun Sep 24, 2023 10:54 am
Has thanked: 27 times
Been thanked: 13 times

Re: [WIP] Dual motor W124 E320 Estate

Post by RobCote »

Well, with all that done, I've been able to slowly chip away here and there at the long reassembly process. It could be quick and easy, but we like doing things the hard way, right? I've been thinking a lot about scope creep or project creep lately, as I'm obviously in the thick of it. I won't bore you with literally watching paint dry, but that's been most of the time lately. I figured while I was in here, with everything apart, I might as well put a fresh coat of paint on things, right? Make it look halfway decent. Plus, I wanted to try out a technique.

Let me explain a bit further. So, as you know, I've had the rear suspension in and out of this thing a zillion times. As I was approaching what I hope to be one of the last times it goes in, I figured it would be wise to check out the status of the bushings. Mercedes put FIVE suspension arms PER SIDE on this car. WHY?? That's 20 bushings/bearings in the rear suspension alone, plus 4 to mount the subframe to the car and 3 to mount the motor. Anyway, somehow most of the control arm bushings appear to be in great shape. No dry rot on the rubber or excessive flex. The lower control arms needed one new bushing on each side of the car, so I completely disassembled everything. Once I had the hub assembly off to press out the old bushing, I realized the dust shield was in my way. In order to move that around, I had to disassemble the parking brake assembly (it's a drum setup inside of the rear rotor "hat") to access the bolts. THEN I could remove and reinstall the bushing and begin reassembly. But I figured why not clean everything up and put a fresh coat of paint on it first, you know?

Image

Image

I really only needed to take off the one end of all the control arms, but at that point it was only 5 more easily accessible bolts (per side) to remove the arms from the subframe so what the heck. That gave me room to clean and paint them. I'm so pumped with how they came out. The splatter effect was the technique I wanted to try out and it went so well. I'm stoked.

Image

Image

I put a fresh coat of satin black on the subframe to protect all the welds and make it look nice and nice. I seam sealed the underside of the car, primed, and painted it black to make everything disappear. I sprayed cavity wax inside the tubular sections of the subframe. Then, I installed new bushings in the subframe mounts. I reassembled all the control arms and the hub assembly. Then I repeated the whole process on the other side. This has been weeks of a little bit of time here and there which is frustrating, but hey progress is progress. Finally, as of yesterday, I was able to get the suspension assembly put back into the car for what might be (but probably won't be) the last time! It looks so awesome. I've gotta torque fasteners and stuff once it's more complete, but that's easy.

Image

Image

Image

Next up, I have to reconfigure the motor to drive in reverse...
jrbe
Posts: 595
Joined: Mon Jul 03, 2023 3:17 pm
Location: CT, central shoreline, USA
Has thanked: 212 times
Been thanked: 173 times

Re: [WIP] Dual motor W124 E320 Estate

Post by jrbe »

The 5 link suspension puts the pivot points in impossible places with mechanical means. Also known as virtual pivot.
This has huge implications for handling, kingpin inclination, scrub radius, anti squat, anti lift, and many other suspension attributes.
Complexity, yes. Better handling over simple suspensions, yes.
RobCote
Posts: 131
Joined: Sun Sep 24, 2023 10:54 am
Has thanked: 27 times
Been thanked: 13 times

Re: [WIP] Dual motor W124 E320 Estate

Post by RobCote »

I know but at what point is it diminishing returns? Where does the average driver notice no difference? Rhetorical questions I know. I’m not mad at it, it just seems wild that they’d pay to produce it assuming most won’t notice a performance difference.

That said, driving it across the country with completely blown out rear shocks wasn’t as bad as it should have been. So maybe there’s something to it.
jrbe
Posts: 595
Joined: Mon Jul 03, 2023 3:17 pm
Location: CT, central shoreline, USA
Has thanked: 212 times
Been thanked: 173 times

Re: [WIP] Dual motor W124 E320 Estate

Post by jrbe »

I think this was one of, if not the first 5 link suspensions.

Yeah it's pricey, a pain to configure / reconfigure, and do the bushing deflection calcs. Then maintenance gets costly.

Most people just notice how stable and predictable of a vehicle it is and have no idea why. Rear suspension plays a big role in overall stability & predictability by keeping the tires pointed where they need to be. It's a delayed feedback as you don't have a steering wheel connecting you to the rear tires, so the more predictable the better.

The virtual pivots allow for less compromises in the suspension design so they end up with a more costly but better overall suspension. There is 0 chance the OEMs would do all of this effort and cost if it wasn't worth it, especially for this long.
RobCote
Posts: 131
Joined: Sun Sep 24, 2023 10:54 am
Has thanked: 27 times
Been thanked: 13 times

Re: [WIP] Dual motor W124 E320 Estate

Post by RobCote »

If any of you guys prefer video over reading and pretty pictures, I put together a bunch of progress from the last few months here:

User avatar
johu
Site Admin
Posts: 6708
Joined: Thu Nov 08, 2018 10:52 pm
Location: Kassel/Germany
Has thanked: 367 times
Been thanked: 1536 times
Contact:

Re: [WIP] Dual motor W124 E320 Estate

Post by johu »

Shaped up to be quite entertaining :)
Support R/D and forum on Patreon: https://patreon.com/openinverter - Subscribe on odysee: https://odysee.com/@openinverter:9
RobCote
Posts: 131
Joined: Sun Sep 24, 2023 10:54 am
Has thanked: 27 times
Been thanked: 13 times

Re: [WIP] Dual motor W124 E320 Estate

Post by RobCote »

Does anyone know how to open up the model s charge port? I got it pretty well apart, but I couldn't separate the "shroud" piece around the actual interface for the EVSE connector. Specifically, the top/upper portion in this photo - the piece that has the little circle "button" on it:

Image

What am I missing? I'd love to get it apart to make for a cleaner installation.
Post Reply