QCA7000 Foccci+Clara User thread
-
muehlpower

- Posts: 807
- Joined: Fri Oct 11, 2019 10:51 am
- Location: Germany Fürstenfeldbruck
- Has thanked: 18 times
- Been thanked: 186 times
Re: QCA7000 Foccci+Clara User thread
With my AC charging implementation, locking works as long as the two treshholds are the same or with feedback if the mechanism is not blocked. A mechanical opening remains unnoticed. With AcObcState I have not found a value that unlocks again. I could help myself if I use the new ActuatorTest for closing and opening, then only the switching of the 1k3 resistor remains for AcObcState, since I don't use the LED control anyway.
-
uhi22

- Posts: 1244
- Joined: Mon Mar 14, 2022 3:20 pm
- Location: Ingolstadt/Germany
- Has thanked: 245 times
- Been thanked: 684 times
Re: QCA7000 Foccci+Clara User thread
Does UdcDivider 2.72 not work?
Github: http://github.com/uhi22 --- Patreon: https://www.patreon.com/uhi22
-
muehlpower
- Posts: 807
- Joined: Fri Oct 11, 2019 10:51 am
- Location: Germany Fürstenfeldbruck
- Has thanked: 18 times
- Been thanked: 186 times
Re: QCA7000 Foccci+Clara User thread
I didn't try any decimal numbers, but you're right. Now it works and I get 320V.
-
uhi22
- Posts: 1244
- Joined: Mon Mar 14, 2022 3:20 pm
- Location: Ingolstadt/Germany
- Has thanked: 245 times
- Been thanked: 684 times
Re: QCA7000 Foccci+Clara User thread
Now introduced a parameter to select the intended lock control behavior: LockControlVariant
with the possibilities
0=TimeBased_VirtualFeedback. The motor is controlled for the LockRunTime, once a new request comes in. The hardware feedback is ignored. The feedback in the spot value LockState is calculated in software, just based on the time.
1=TimeBased_HwFeedback. The motor is controlled for the LockRunTime, once a new request comes in. Independing of the actuation, the hardware feedback is always transferred into the spot value LockState. This only will have the states Closed or Open. No intermediate states Opening or Closing. Not sure whether this needs to be improved.
2=FeedbackBased. This is the old behavior. Motor is driven as long as the target state is not reached. Risk for smoke. Some unclear implementation for the "states in between", in two dimensions: Level-wise, what shall happen if the analog feedback is in the middle range. And time wise, do we need to artificially create the states Opening and Closing even we have a digital feedback switch. Needs to be analyzed whether we want to keep / improve this behavior.
So for the muehlpower use case, the option TimeBased_HwFeedback should be the solution.
Binaries: Build #101 in https://github.com/uhi22/ccs32clara/actions
Github: http://github.com/uhi22 --- Patreon: https://www.patreon.com/uhi22
-
muehlpower
- Posts: 807
- Joined: Fri Oct 11, 2019 10:51 am
- Location: Germany Fürstenfeldbruck
- Has thanked: 18 times
- Been thanked: 186 times
Re: QCA7000 Foccci+Clara User thread
I have installed the new software and adapted my programming. It works well. My system is activated with a button (white light). If nothing is plugged in within 30 seconds, it is deactivated again. After plugging it in, it locks, regardless of the PWM (orange light). If a suitable AC PWM is present, the main contactors are closed and the control unit for the cooling and the DC-DC converter are started (blue light). As soon as the EVSE supplies current, charging begins (blue flashing light). The charging process is interrupted if the PWM is missing and then starts again. The main contactors are opened and the other things are also shut down. The second video shows an error when the plug is not fully inserted (red light).
-
dougyip

- Posts: 82
- Joined: Thu May 09, 2019 2:02 pm
- Location: Vancouver, BC
- Has thanked: 9 times
- Been thanked: 16 times
Re: QCA7000 Foccci+Clara User thread
I've been successfully charging our race car since last year on the same PhiHong charger - until the weekend. After one successful charge in the AM, either the charger, or Foccci, would fault out after the charge sequence had advanced to OpMode 11. The station seems functional as other vehicles have charged after we were unsuccessful. Unfortunately, I do not have any error logs, so I am planning to go back to the track again to test again and obtain logs if there are still issues. What is happening in OpMode 11? What can I check in the garage before heading back out to the track again?
-
uhi22
- Posts: 1244
- Joined: Mon Mar 14, 2022 3:20 pm
- Location: Ingolstadt/Germany
- Has thanked: 245 times
- Been thanked: 684 times
Re: QCA7000 Foccci+Clara User thread
The OpMode 11 is WaitForPreChargeResponse, so Foccci demands to the charger to set the voltage according to the battery voltage. This continues, and normally, if the charger output voltage matches the battery voltage, the next step is to close the contactors in OpMode 12.
If the precharge does not succeed, I can imagine the following root causes:
- Battery voltage which comes from BMS to Foccci is outside of the range which is supported by the charger.
- CAN mapping lost, so that no battery voltage comes to Foccci.
- Physical issue with the HV lines to the charge port, so that the charger is not able to reach the intended voltage.
- Parameters corrupted in Foccci.
- If you use a hardware voltage sense board: broken cable or something like this.
- ... maybe more ...
Before driving to the charger, you could first check Focccis parameters, and whether the battery voltage is correctly received.
When at the charger, the most helpful information is a log of Focccis serial line, this shows a lot of details which should quite clearly show the root cause.
Happy testing, hopefully it is only a small issue.
Github: http://github.com/uhi22 --- Patreon: https://www.patreon.com/uhi22
-
dougyip
- Posts: 82
- Joined: Thu May 09, 2019 2:02 pm
- Location: Vancouver, BC
- Has thanked: 9 times
- Been thanked: 16 times
Re: QCA7000 Foccci+Clara User thread
Thanks! Parameters look good. I'm using the HV Sense board, so maybe the calibration is out. I will check it and also test with option to use the Charger Input voltage instead of the HV Sense board.
-
dougyip
- Posts: 82
- Joined: Thu May 09, 2019 2:02 pm
- Location: Vancouver, BC
- Has thanked: 9 times
- Been thanked: 16 times
Re: QCA7000 Foccci+Clara User thread
Success! I changed the Inlet Voltage Source to the Charger Output Voltage and the system worked flawlessly. I'm using an older version of Clara that only has UDCDivider and no configurable UDCOffset. As a result, with just a single calibration point, my inlet voltage has always been 5-10V off. That's probably what got me into trouble last weekend. Thanks again for the help!
-
Proton

- Posts: 366
- Joined: Sat May 06, 2023 2:23 am
- Location: Georgia/US
- Has thanked: 227 times
- Been thanked: 57 times
Re: Tool to manage openinverter via CAN
Can Uhi make a video with the CCS board and explain all connections and how do they need to be connected to a CCS1 socket or ccs2 socket ?johu wrote: ↑Wed Oct 15, 2025 6:39 pm Clara updated https://github.com/uhi22/ccs32clara/com ... b48018e46f
I just bought a CCS1 socket with the cables and would like to know what I am getting into if I buy the board.
-
johu

- Site Admin
- Posts: 7182
- Joined: Thu Nov 08, 2018 10:52 pm
- Location: Kassel/Germany
- Has thanked: 552 times
- Been thanked: 1913 times
- Contact:
Re: Tool to manage openinverter via CAN
Support R/D and forum on Patreon: https://patreon.com/openinverter - Subscribe on odysee: https://odysee.com/@openinverter:9
-
uhi22
- Posts: 1244
- Joined: Mon Mar 14, 2022 3:20 pm
- Location: Ingolstadt/Germany
- Has thanked: 245 times
- Been thanked: 684 times
Re: QCA7000 Foccci+Clara User thread
I would prefer the question-answer approach, with the goal to further extend the FAQ section in the Wiki (maintained by everyone). I think this makes the information more accessable and more agile than two hours of boring technical video.
Github: http://github.com/uhi22 --- Patreon: https://www.patreon.com/uhi22
-
Proton
- Posts: 366
- Joined: Sat May 06, 2023 2:23 am
- Location: Georgia/US
- Has thanked: 227 times
- Been thanked: 57 times
Re: QCA7000 Foccci+Clara User thread
For example this is the CCS1 (USA) socket I got from China:
I see CP in the wiki but not CS,
I do not see PIN1,PIN2,PIN3 and PIN4.
Would be nice to have a video with an explanation on what is each pin, what is does and how to connect it.
I have 3 temp probes. WIKI specifies a 10k resistance, but I do not know if I have to add one to mine.
-
tom91

- Posts: 2962
- Joined: Fri Mar 01, 2019 9:15 pm
- Location: Bicester, Oxfordshire
- Has thanked: 328 times
- Been thanked: 847 times
Re: QCA7000 Foccci+Clara User thread
If you cannot work this out, you will struggle to get FOCCCI programmed and working properly. Let alone implement this safely so I strongly advise you against doing this till you understand CCS charging and BMS systems and their interactions.
Start by creating a data sheet of which goes where on your connector if you do not have a datasheet.
Hint on your temps is right there in the wiki pin table, just read and think how does a thermistor work they are label T1+ and T1- on purpose.
Code: Select all
TEMP1 A1 A1 Power pin temperature sensor. It is pulled up to 3.3V with 10k and the sensor must pull down to GND. Sensor characteristics are configurable in software-
uhi22
- Posts: 1244
- Joined: Mon Mar 14, 2022 3:20 pm
- Location: Ingolstadt/Germany
- Has thanked: 245 times
- Been thanked: 684 times
Re: QCA7000 Foccci+Clara User thread
Since we do not know the data sheet of this charge port, we just can make some guesses, and you need a multimeter to check whether they are true.
Seems we have two temperatur sensors. Measure the resistance between T1+ and T1-, and between T2+ and T2-. They should be nearly equal. Measure in the other direction. Should lead to the same results. This would confirm, that we have two temperature-dependent resistors (and not other sensors like diodes or onewire or whatever). If these are resistors (NTCs), connect one end to ground and the other to the Focccies temperature inputs. Foccci has three of them, but we have only two in the charge port. This does not matter, we leave the third unconnected. Foccci interprets this a large negative temperature, this will not hurt, everything fine. Since there are different possibilies of the NTC characteristics, it is necessary to set parameters for the NTC. You can start with default settings, and check whether Foccci shows the correct temperature. Try at leat with two different temperaturs (put the inlet into the kitchen stove and heat e.g. to 80°C). If there is no data sheet of the NTC, it may need some measurements to find out the parameters.
Next is the CP, this is easy, just connect to Focccis CP.
The CS is unusual, but I guess they connected it to PP. Use multimeter to confirm. Also measure the resistance between PP and PE. Some charge ports have a resistor inside, some not. Foccci needs to know this.
The most difficult is the charge port locking. Usually this consists of a DC motor and a feedback switch. So I assume: Two lines for the motor, two lines for the switch. Try to find out using resistance measurement, which pins are the motor. If this is clear, try with a lab power supply to actuate the motor in both directions. Start with 5V and current limited to 100mA, to not destroy anything. If this works, check wether it looks okay to use 12V. If the motor turns fine with 12V in both directions, you can connect the motor lines to Focccis motor outputs. Connecting the feedback lines is optionally, you can configure Foccci to just operate the motor for one second. If you want to use the feedback, measure the resistance in locked and unlocked position, and connect one feedback line to ground and one to the Focccis lock feedback input. Set the parameters in Foccci to match the physical situation.
PE is chassis ground, and needs to have a short path to Focccis ground.
(Edit: Added more details to the pin description in the wiki.)
Github: http://github.com/uhi22 --- Patreon: https://www.patreon.com/uhi22
-
muehlpower
- Posts: 807
- Joined: Fri Oct 11, 2019 10:51 am
- Location: Germany Fürstenfeldbruck
- Has thanked: 18 times
- Been thanked: 186 times
Re: QCA7000 Foccci+Clara User thread
I have a CCS charger to test over the holidays. Unfortunately, I haven't managed to establish communication with focci yet. AC works fine. With the CCS charger connected, I see 5% PWM, but no other information, such as EVSE max current or voltage. How can I test whether there is a PLC? Oscilloscope?
-
Bigpie
- Posts: 1884
- Joined: Wed Apr 10, 2019 8:11 pm
- Location: South Yorkshire, UK
- Has thanked: 91 times
- Been thanked: 517 times
Re: QCA7000 Foccci+Clara User thread
I used a raspberrypi and a modified home plug to mimic the evse side when I was having issues with the PLC
BMW E91 2006
ZombieVerter
GS450h
Outlander Charger DC/DC
Outlander Compressor
Renault Kangoo 36kWh battery
FOCCCI CCS
ZombieVerter
GS450h
Outlander Charger DC/DC
Outlander Compressor
Renault Kangoo 36kWh battery
FOCCCI CCS
-
muehlpower
- Posts: 807
- Joined: Fri Oct 11, 2019 10:51 am
- Location: Germany Fürstenfeldbruck
- Has thanked: 18 times
- Been thanked: 186 times
Re: QCA7000 Foccci+Clara User thread
The CCS charger I use has a start button. After plugging it in, the CAN web interface toggles between 6 and 100 at “checkpoint”; when I start the CCS, it toggles between 6 and 200. Does this mean that communication is taking place? Does 200 mean that focci is waiting for the charger's IP address?
-
muehlpower
- Posts: 807
- Joined: Fri Oct 11, 2019 10:51 am
- Location: Germany Fürstenfeldbruck
- Has thanked: 18 times
- Been thanked: 186 times
Re: QCA7000 Foccci+Clara User thread
Using a Raspery Py or a home PLC device is way beyond my capabilities, so I borrowed a ready-made CCS charger for the EVSE side. It's only 15 kW, but it should be enough for communication and parameterization of FOCCI.
-
muehlpower
- Posts: 807
- Joined: Fri Oct 11, 2019 10:51 am
- Location: Germany Fürstenfeldbruck
- Has thanked: 18 times
- Been thanked: 186 times
Re: QCA7000 Foccci+Clara User thread
Two days later, no progress. I see 5% ControlPilotDuty, 13A CabelCurrentLimit, etc. on the web interface, but the checkpoint is at 200, briefly changes to 6, and then goes back to 200, approximately every 10 seconds. Do I have PLC communication? What is foccci or the EVSE waiting for?
-
johu
- Site Admin
- Posts: 7182
- Joined: Thu Nov 08, 2018 10:52 pm
- Location: Kassel/Germany
- Has thanked: 552 times
- Been thanked: 1913 times
- Contact:
Re: QCA7000 Foccci+Clara User thread
Set DemoControl=StandAlone and DemoVoltage=230V
Otherwise Foccci will inhibit anything because of CANTIMEOUT
Otherwise Foccci will inhibit anything because of CANTIMEOUT
Support R/D and forum on Patreon: https://patreon.com/openinverter - Subscribe on odysee: https://odysee.com/@openinverter:9
-
muehlpower
- Posts: 807
- Joined: Fri Oct 11, 2019 10:51 am
- Location: Germany Fürstenfeldbruck
- Has thanked: 18 times
- Been thanked: 186 times
Re: QCA7000 Foccci+Clara User thread
Hello johu, cantimeout is not my problem, as I am sending the messages. I have since discovered that I must start the charger first and then plug it in. Now it runs through, precharges, and shuts down when charging. When I set InletVtgSrc from AnalogInput to ChargerOutput, charging works.
Code: Select all
PreCharge aknowledge received. Inlet 276V, accu 369V, uMin 200V
[9330] Difference too big. Continuing PreCharge.
[9330] TCP will transmit: 01fe800100000011809a00405151400f40c143c4080c0c0040
[9330] ETH will transmit: 44032cf7dfaf02343067244386dd60000000002d060afe80000000000000c69083f3fbcb981efe8000000000000044032cfffef7dfafe754c001000001ac0000089b501803e86236000001fe800100000011809a00405151400f40c143c4080c0c0040
[9390] ETH rx IP: 02343067244344032cf7dfaf86dd60000000002c06fffe8000000000000044032cfffef7dfaffe80000000000000c69083f3fbcb981ec001e7540000089b000001c5501005dce8f1000001fe800100000010809a00405160004080a0010285f08800
[9390] [TCP] sending ACK
[9390] ETH will transmit: 44032cf7dfaf02343067244386dd600000000014060afe80000000000000c69083f3fbcb981efe8000000000000044032cfffef7dfafe754c001000001ac000008b3501003e8cf1c0000
[9390] Data received:  01fe800100000010809a00405160004080a0010285f08800
[9810] PreCharge aknowledge received.
PreCharge aknowledge received. Inlet 368V, accu 369V, uMin 200V
[9810] Difference between accu voltage and inlet voltage is small.
[9810] Turning on charge port contactor 1
[9810] In state ContactorsClosed. TcpRetries 0
[9900] [CONNMGR] 165 0 0 501 31 147 327 --> 100
[10140] Turning on charge port contactor 2
[10290] Contactors assumingly finished closing. Sending PowerDeliveryReq.
[10290] TCP will transmit: 01fe80010000000d809a004051322200000f400000
[10290] ETH will transmit: 44032cf7dfaf02343067244386dd600000000029060afe80000000000000c69083f3fbcb981efe8000000000000044032cfffef7dfafe754c001000001c5000008b3501803e818be000001fe80010000000d809a004051322200000f400000
[10290] In state PowerDelivery. TcpRetries 0
[10320] ETH rx IP: 02343067244344032cf7dfaf86dd60000000002706fffe8000000000000044032cfffef7dfaffe80000000000000c69083f3fbcb981ec001e754000008b3000001da501005dc3452000001fe80010000000b809a004051400420405000
[10320] [TCP] sending ACK
[10320] ETH will transmit: 44032cf7dfaf02343067244386dd600000000014060afe80000000000000c69083f3fbcb981efe8000000000000044032cfffef7dfafe754c001000001c5000008c6501003e8cef00000
[10320] Data received:  01fe80010000000b809a004051400420405000
[10330] Checkpoint700: Starting the charging loop with CurrentDemandReq
[10330] TCP will transmit: 01fe80010000001c809a004050d1400f40c0c0146001810580480c08360100c142040c00
[10330] In state CurrentDemand. TcpRetries 0
[10410] [TCP] sending ACK
[10410] Data received:  01fe800100000023809a004050e0004080a0010286a0e01018000000040a1104e02030ca02028385280800
[10410] Large
 of the inlet voltage. Stopping.
Hardware 11793V, Evse 7161V, Deviation 4632V
[10410] TCP will transmit: 01fe80010000000d809a004051302200000f400000
[10410] TCP will transmit: 01fe80010000001c809a004050d1400f40c0c0146001810580480c08360100c142040c00
[10440] [TCP] sending ACK-
uhi22
- Posts: 1244
- Joined: Mon Mar 14, 2022 3:20 pm
- Location: Ingolstadt/Germany
- Has thanked: 245 times
- Been thanked: 684 times
Re: QCA7000 Foccci+Clara User thread
Obviously the voltage values in the log are crap. I will check the code later.
Github: http://github.com/uhi22 --- Patreon: https://www.patreon.com/uhi22
-
uhi22
- Posts: 1244
- Joined: Mon Mar 14, 2022 3:20 pm
- Location: Ingolstadt/Germany
- Has thanked: 245 times
- Been thanked: 684 times
Re: QCA7000 Foccci+Clara User thread
While charging is working, could you look to the spot values
InletVoltageHw and EvsePresentVoltage? They shall be nearly the same.
And InletVoltageDeviation shall show the difference.
InletVoltageHw and EvsePresentVoltage? They shall be nearly the same.
And InletVoltageDeviation shall show the difference.
Github: http://github.com/uhi22 --- Patreon: https://www.patreon.com/uhi22
-
muehlpower
- Posts: 807
- Joined: Fri Oct 11, 2019 10:51 am
- Location: Germany Fürstenfeldbruck
- Has thanked: 18 times
- Been thanked: 186 times
Re: QCA7000 Foccci+Clara User thread
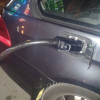
I have made further attempts. When I take the DC voltage from the charger output, it works. I think the problem is checking the difference in connection with a time offset!
Image with charger output
Image with analog input
Image with charger output
- Attachments
-