The story so far:
My daughter (who is still a ways away from driving) came to me with the idea of converting a "cool car" to electric. After some research, a Porsche 944 seemed to be a good fit. We talked about it and came up with a rough game plan. Here's a basic rundown on where we started and where we are now.
Starting assumptions, 12/19:
300+ miles of range
CCS or Chademo charging
Better than stock horsepower
Keep outside as original as possible, preferably completely original
Buy an intact body with wrecked everything else and restore it
Where we are today:
Still on track for 300+ miles with 85kWh battery pack made from 1.25 Chevy Bolt battery packs equivalent
Going with Tesla LDU "ludicrous" capable, planning for 600+ HP (triple stock). Have to run it in reverse as the motor fits far better backwards.
Outside will be completely original, save for bigger rims front and back
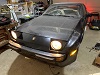
Bought a shell for $1k that was in reasonably good shape
CCS looks to be within reach now, so bye bye chademo, hello CCS combo inlet
Repairs/design changes so far
Interior completely gutted, pedals removed, wheel removed, dash pulled out
12v system completely repaired, lights, fans, etc all fully functional and kept stock
Currently working on the custom battery pack... this is going to be *at least* 50% of the total work involved.
Exterior bits all fixed, key holes swapped out, new keys made, door handles fixed, etc. Exterior paint is crap but that can wait.
Brakes pulled, lubed, discs replaced, old system yanked (needed the space) dual master braking system waiting for install
Stock phone dial rims repainted black with black/gold interior badges
Nose crest replaced
Rear center light replaced
About the battery pack:
The battery pack has to be built in three sections due to weight/fitting issues. They are divided thusly:
120 cells mounted ahead of the front axle ~260lbs
136 cells mounted behind the rear axle ~300lbs
128 cells mounted where the useless rear seats used to be ~280 lbs
This is will make a 4p96s setup for a fully charged voltage of 403.2V and 85kwh (384 cells x 60AH x 3.7v)
Connectors are all 6061 aluminum 3"x1/2" (pretty much the max size I can fit in between the cells)
Planning on a water cooling system. That has not yet been developed, and won't be until I've finally assembled all of the battery sub-assemblies.
Planning on an Orion 2 BMS.
Coming up/next steps:
Weigh the car before components go in to give a baseline weight
Large aluminum order incoming that should give me enough to finish the battery pack connectors. Building the connectors is a long, slow process, unfortunately, and while we're much faster than we were, we're still not fast by any stretch.
Battery box creation and installation
Once I (finally!) have the battery boxes done and installed, I can start all the wiring, A/C hose routing, contactor box, etc.
1987 Porsche 944 S conversion [WIP]
-
EVconverter
- Posts: 15
- Joined: Tue Dec 08, 2020 12:42 pm
- Been thanked: 3 times

-
EVconverter
- Posts: 15
- Joined: Tue Dec 08, 2020 12:42 pm
- Been thanked: 3 times
Re: 1987 Porsche 944 S conversion
Either that or an epic fail. Either way I'll get a good story out of it.
Go big or go home, right?
-
EVconverter
- Posts: 15
- Joined: Tue Dec 08, 2020 12:42 pm
- Been thanked: 3 times
Re: 1987 Porsche 944 S conversion
The cruel math of building a custom battery pack
I'm using 3"x1/2" 6061 aluminum to build connectors for the batteries I'm using. Since I'm using tabbed batteries, I'm making ends that compress the tabs together using long machine screws to hold everything in place.
Each end unit requires 5 individual pieces of aluminum (4 tabs held together).
Each middle unit requires 9 individual pieces of aluminum (8 tabs held together).
So in total I need to make 927 pieces of aluminum, about 40 linear feet, not including what's lost in the cutting.
Each piece requires the following:
1 Cut
2 holes drilled
3 rounds of polish (60/240/1000)
Each step requires a cool-down time, as they all generate quite a bit of heat, especially the sanding. I discovered mechanic's gloves don't resist heat well enough, so I moved to welder's gloves.
And that's just to fit all the cells together. After all this is done, then the battery boxes need to be built, the individual tiers need to be connected together, etc.
This phase is like moving 10 tons of pebbles. It's not difficult, but it is a lot of work.
The pictures are of the batteries when they arrived, one half of the rear seat set, and the prototype of the connector I'm making.
- Attachments
-
-
-

Re: 1987 Porsche 944 S conversion
I would take a look at SendCutSend.com for those aluminum pieces. I use them for quite a bit of my custom fab stuff that I want to *not* look like I made it with pliers and a dull hacksaw.
If you have that many to make....automate it for sure.
If you have that many to make....automate it for sure.
-
EVconverter
- Posts: 15
- Joined: Tue Dec 08, 2020 12:42 pm
- Been thanked: 3 times
Re: 1987 Porsche 944 S conversion
I've got everything set for mass production now, and i can crank out the pieces fairly quickly.
The slowest part now is the battery testing. It takes about 8 hours for each set of two packs to do a cycle test, so it's going to take weeks to get it all done. The test ends with a bottom balance at 3.6V, so when I build the pack each individual cell will be at exactly the same point.
I hope to deliver the first pack to my fabber for construction next week. 120 cells in the first set. Just the cells will weigh ~250lbs, so the pack with the cooling loop will likely be around 300lbs.
Thanks for the suggestion for the aluminum fabbing. I'll take a look for the more complex stuff I'm going to need.
-
EVconverter
- Posts: 15
- Joined: Tue Dec 08, 2020 12:42 pm
- Been thanked: 3 times
Re: 1987 Porsche 944 S conversion
A few updates.
Ran into a few more production snags - like my poor old drill press blowing through capacitors, forcing me to order a new one every time it happens. I've ordered a much more powerful one (13A vs my little 5A) that should remedy that particular problem and speed up my drilling besides.
Finally figured out the brake situation. I had to go with a floor-based brake pedal, that has to sit on a platform. I've cut the platform pieces out and they are out for fabrication. The design ended up wildly different than what I expected, but hey, German engineering.
I've tested enough of the batteries to assemble the first battery pack. I hope to have that done soon after the new drill press comes in. Then I can finally get the first pack built and in place.
I've managed to source terminals, a maintenance switch, and contactors that can support the full amperage of the motor. I'm thinking that I'm going to put the maintenance switch in front of the gear selector and label it "Time Circuits". It's a lockout type, so I can safe the car with a lock if necessary.
Not as much progress as I'd like, but I'm going to have one hell of a metal shop by the time I'm done. If only I could afford a waser...
-
EVconverter
- Posts: 15
- Joined: Tue Dec 08, 2020 12:42 pm
- Been thanked: 3 times
Re: 1987 Porsche 944 S conversion
Wohoo! I got my new drill press and it works like a champ. Makes the aluminum holes at 500rpm without any binding, tearing or any other issues. IT's also faster as I can put more weight on the handle. I went from a 5A model to a 13A model and it makes a huge difference. I think I have enough cut, drilled and polished pieces to make the first full battery pack. Hopefully I'll get that knocked out this week. My fab guy is out of the country for a bit, so I'm a bit hamstrung in certain areas until he gets back.
I got the CCS Combo 1 inlet today. It's bigger than I expected (They sent me the wrong one), but it should still work. After digging into the issues a little more, it looks like I'm going to have to cut the channel for the old filler tube to allow the cables to bend naturally. The current tube bends sharply down and I don't think I can successfully mount the inlet with the wires attached at that angle. I'm going to try cutting the inlet tube so I can access the interior bulkhead and see if I can mount the inlet panel behind the existing exterior hole without touching the exterior bulkhead. It looks doable, but I won't know for sure until I start chopping. I think I'll put 2-3' of cable on the DC fast charger terminals so I won't have to demount the inlet later. We'll see. At least the inlet looks well designed and sturdy.
I have my main contactors coming in, but I'm still sourcing a master switch, as the US seems to be completely out of all of them at the moment.
Edit - I was able to test fit the inlet. Installing it should be no problem, but I'll have to figure out how to set up a seal between the inner and outer bulkhead.
- Attachments
-
-
-
EVconverter
- Posts: 15
- Joined: Tue Dec 08, 2020 12:42 pm
- Been thanked: 3 times
Re: 1987 Porsche 944 S conversion
Quick update, the first two battery boxes are out for fabrication. They will both fit under the hood. 124 two-pack modules total.
Looks like an Orion BMS 2 108 port version will serve well. Each battery box will have it's own port, with 30, 32, and 36 leads respectively.
Looks like an Orion BMS 2 108 port version will serve well. Each battery box will have it's own port, with 30, 32, and 36 leads respectively.
-
bobby_come_lately
- Posts: 466
- Joined: Sun May 03, 2020 5:39 am
- Location: Manchester, UK
- Has thanked: 37 times
- Been thanked: 39 times
- Contact:
Re: 1987 Porsche 944 S conversion
Good to see another daughter-inspired project! Mine has done a good chunk of the welding and spannering on mine, though she doesn't find the electrics/electronics so exciting. Great choice of car.
Re: 1987 Porsche 944 S conversion
Great post. I have had a 944 previously and now a 968 in the garage which needs quite a bit of mechanical work. Since we got a Leaf, I am now seriously considering converting it to electric. I am a complete newbie to this so any help to start my project of is welcome. Thanks for sharing!
-
EVconverter
- Posts: 15
- Joined: Tue Dec 08, 2020 12:42 pm
- Been thanked: 3 times
Re: 1987 Porsche 944 S conversion
Currently working on the water cooling. I've been quoted $2500 per unit (I need 7) so that's a no go. I'm trying to find an off the shelf solution that will work, as well as semi-custom solutions. This is the last major problem to overcome for the battery packs. I have several irons in the fire on that front.
The motor should be in place in the next couple of weeks. Once that's done I'll post pics of the placement. Once that's in place I can start working on the motor contactor placement and related wiring. I plan to use the torque tube channel for all the wiring, contactors, fuses, etc and put a plate under it so it won't catch any rocks while driving.
The motor should be in place in the next couple of weeks. Once that's done I'll post pics of the placement. Once that's in place I can start working on the motor contactor placement and related wiring. I plan to use the torque tube channel for all the wiring, contactors, fuses, etc and put a plate under it so it won't catch any rocks while driving.
-
EVconverter
- Posts: 15
- Joined: Tue Dec 08, 2020 12:42 pm
- Been thanked: 3 times
Re: 1987 Porsche 944 S conversion
I think I've hit on my water cooling solution.
I've found aluminum cooling blocks for (relatively) cheap. I can use 4, 5 or 6 of them in series to fit my battery pack designs.
I've also found this as an AC-to-water heat exchanger, so I can keep the batteries below ambient when charging and on hot days.
https://killerchiller.com/products/univ ... ace-system
I'm almost ready to finalize the battery design. I hope to have the first pack more or less ready this weekend. Once I have the design finalized, the other two will be basically cut and paste.
Now all I have to do is design an AC system! Compared to the batteries, this should be cake.
Re: 1987 Porsche 944 S conversion
Love it! thanks for posting. I'm working on a 1896 944 N/A conversion too. Planning on:
motor: Tesla S/X rear SDU, with open-inverter board. I was originally thinking Tesla Model 3 with controller from Ingenext, but I'm not sure it will fit because rear M3 drive unit sits in front of the axle, and I don't think I have clearance in the 944 transmission area for this.
battery: 16 x 22.2V VDA355 style battery modules, each 2.2 kWh and 2p6s, for a total pack of 2p96s, 355V, 35 kWh. I'm expecting a range of ballpark 50 - 100miles
battery pack cooling: aluminum cooling plates from Felten (formerly ZeroEV)
BMS: likely Orion 2 but TBD
Right now, I've secured battery modules, and now shopping for Tesla motor to start to control it on the bench. Also designing battery pack and battery box in paralle.
Basic geometry will be copying Electric Classic Cars conversion of a 944 S2: battery under the hood, motor between the rear wheels where transmission used to be, preserve interior cabin, aim for close to 50/50 weight distribution when done, back / front and left / right
I'll be here with my openinverter questions soon!
-
EVconverter
- Posts: 15
- Joined: Tue Dec 08, 2020 12:42 pm
- Been thanked: 3 times
Re: 1987 Porsche 944 S conversion
So, it's been awhile. Between COVID, personal issues, and having one hell of a time figuring out a water cooling solution, I've been delaying this for far too long. I think I've nailed it, though.
All previous attempts to make a water block have either been ludicrously expensive, unable to make fit into my available space, or unable to handle the pressure required. It's been quite a slog, but this is what I ended up with:
I'm using a block of aluminum CNCd with a channel, made for me by inductive auto (shout out to inductiveauto.com). That plate is covered with a 1/8" plate. Total thickness is 5/8" with 1/4" NPT nipples at each end.
Method:
Sandblast the adhering sides with fine grit sandblasting material
A thick bead on the outside with a thin bead on the inside where the water channels are, using Loctite EA E-20HP adhesive
Two big clamps on the inner structure and six small clamps, one one each corner and one in the middle of the long edge
Let cure for at least 24 hours
Run water through the block for 24 hours to test for leaks
Now that I have a viable solution for water blocks, I can move forward with the battery pack designs. I hope to have battery pack #1 finished and mounted by the end of May.